
When I saw the early descriptions of Seeedstudio.com's Wio Terminal (That link opens Seeed's product page for this little beauty in a new window of tab for you. Enjoy, close it, you'll come back here!)
, I knew I was in trouble.I'm not very good at resisting temptation.
I saw them at a time when there were too many things on my "You really MUST do these jobs" list. File a tax return. Deal with replacing a failing car. Etc.
But it was just too tempting.
I am a long-term user of Arduinos.
I like "gizmos" in general.
While I can get by on the hardware side, doing software is my favorite hobbyist pastime.
And I don't like to spend money.
---
Before I go further, I should underline the fact that the WIO Terminal is NOT "just an Arduino variant"!!! (With a high spec processor, good RAM, etc.)
It seems... we'll find out in this essay!... that it is a device Arduino people will be able to use easily. With some great "bits" as part of the basic INEXPENSIVE ($37 before p&p, etc, Dec 2021) package. (PS- Wrote first part of this paragraph early in my Wio Terminal experiences. My hopes proving well founded, as I "play" with it.)
But... to copy paste from the Seeed site... it is ALSO "compatible with Arduino and MicroPython... AND it can be mounted to a Raspberry Pi as a slave device."
Briefly, before we get to "doing it"... Some highlights of "the built in, always there to use, bits"...
Bluetooth and Wi-Fi connectivity. (12/21: wireless connectivity only supported by Arduino.)
Nice bright, crisp 2.4" LCD Screen integrated in the small package. (20+ lines of 50 characters possible, if you want to go overboard. Perfectly legible. Text (many sizes) and graphics can be mixed. (320 x 240 pixels, LOTS of shades of color available.)
MicroSD card slot. (Record sensor readings. Supply images. Supply configuration data, e.g. wifi ssid/ password.)
I2C "ports"... these open "the world" of sensors to you. And other input devices, and outputs... things like LED characters displays. (There are many basic sensors "built in", too.)
A 4-way-and-press "joystick"/"joyswitch".
Three additional buttons for whatever push-to-make-it-happen things you want to put in the app. Full manufacturer's sales pitch at...
https://www.seeedstudio.com/Wio-Terminal-p-4509.html
===
Another reason I was excited about trying the device was that it came from Seeed. ((Click here for their "about us" page). I've bought from them for years, never disappointed.
Usual sensible Seeed entirely-fit-for-purpose but not-Over-The-Top little reusable box. I do like these people.
You'll need a USB-C charging cable to supply power to the Terminal. (It will be used to upload programs, and to connect the Terminal to the Arduino IDE's Serial Monitor in the usual way.
The basic terminal doesn't have a battery... but a nice "backpack", with a LiPo is available for the device. And of course you can just plug the cable into one of the many easily available battery packs that are on the market, via the "ordinary" cable. (E.g. $14 at Amazon (search on "small protable charger") Take some care in your selection. (I haven't, in finding that example.) Some allow concurrent charging and draining of the pack, which is handy; some don't.
In something similar to the Wio Terminal integrated battery pack, you can also add LoRaWan to your Wio Terminal.
The Wio Terminal comes pre-programmed with a little game. It may "fire up" as soon as you plug the terminal in to a power source. (This is what I would expect.) If it doesn't, check out the modes of operation of the "on/off" switch. ("Up" is off. Slide fully down, release. It will spring back to middle position. Do not flick down rapidly twice in quick succession... for now. (You won't "wreck it", if you do. Just turn off, try again.)
Once you start putting your own programs into the Wio Terminal, you will over-write the game. There's a way to re-load it, discussed at...
https://forum.seeedstudio.com/t/sample-game-on-wio-terminal/253373/5
(You'll need to be all set for programming the Terminal before that discussion will help you... but that's not a big task, not a big ask for the sort of people who should buy one. And there are no costs to it.)
(I PLAN TO DO THE DETAILS AS SEPARATE PAGE, incorp by ref. When I do, I'll pull some "need for 1st session" stuff from my notes for that, put it here for you.)
TO COME... configuring your IDE for the Wio Terminal. (Covered in Seeed's excellent Getting Started guide. This is mainly a matter of using Tools/Board/Board Manager to add "Seeed SAMD Boards" to your installation of the Arduino IDE.)
To COME... basic libraries. (Covered in Seeed's excellent Getting Started guide. This is mainly a matter of using Sketch/ Include Library/ Library Manager" to add some libraries to your installation of the Arduino IDE.)
Once you're "rolling"... and eventually I will fill in the gaps mentioned above, to GET you rolling easily...
Once you are "rolling", putting programs into the Wio Terminal from the Arduino IDE is no different from what you have probably done before, if you've used Arduinos, even a little bit. And it isn't hard, if you haven't.
Did I get your attention? Don't be alarmed if you plugged your Wio Terminal into a source of power. The Important Thing that I wanted to be sure you knew about is something you need only to do before you connect your Wio Terminal (or any other Arduino) to your "big computer" with the Arduino IDE in it. (I'll call that "the development PC" from now on.) ("IDE"? Integrated Development Environment. The way you prepare your own programs ("sketches" in Ardu-speak) for the Wio Terminal or any other Arduino, and "put them in" the device. And the IDE gives you other Good Stuff, but compiling and uploading are the core of what it does.)
This is an important general rule, to be observed whatever board you are programming Arduinos...
Never open the Arduino IDE with an Arduino attached to the development PC, unless you know that the IDE is already set to the type of board you want to connect. ("Tools/Board").
If in doubt, before you launch the IDE...
After that, you can plug the Arduino in.
At the moment, your IDE may not have heard of the Wio Terminal... I'll address that in a moment. But, to finish off the "always set board type" information...
The IDE will remember the last-used board. So if you know that the development PC was configured (in the IDE) for the Wio Terminal the last time you launched the Arduino IDE, you can be confident that it is still configured for that now, and leave any connected Wio Terminal attached to the development PC as the IDE boots.
Your IDE may not have heard of the Wio Terminal.
No problem. (All this is in the Seeed getting started guide, by the way.)
The second step may be puzzling... we aren't (yet) adding a board library. We are telling the Arudino IDE an additional place to look, any time it is told to go find a board library. We are adding a reference to a "library of libraries", if you like.
.... and that's that stuff DONE. You only have to do it once.
-------------
Once that is done, you are ready to do the following, before you connect Wio Terminal to IDE, remember, any time the IDE was used for a different board most recently...
Now plug your Wio Terminal into the development PC. Have a look at Tools again, click on the "Port" selector. And select the COM port the Wio Terminal is on. (If which you should use isn't clear, go for the highest numbered one. (There's more about this in the official guide, if you have trouble.))
The "Port" setting has to be right eventually... but it isn't important... or even reliably possible... to set that before you connect everything, "turn it on".
A lot of words. But much of the above you only do once. And the rest is easy, becomes second nature in no time.
Just think of the Wio Terminal as being an "ordinary" Arduino with some stuff attached. ("Stuff" = switches, sensors, output devices.)
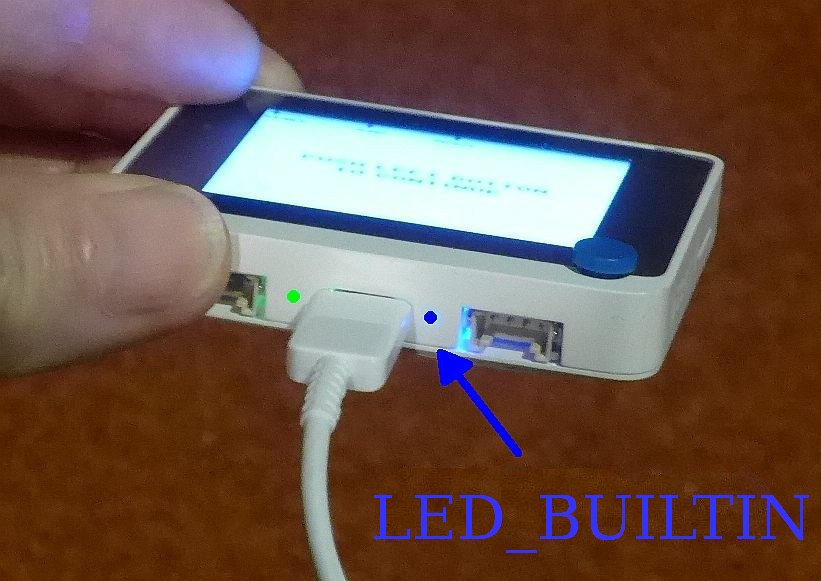
It will be a little different from that because the "stuff" will be permanently attached via specific data lines. (Bad, if you want to re-purpose a particular IO line... but good in that you are saved bother. Also good because as part of the Wio Terminal libraries, many of these things are given human-friendly names, "aliases", helping you remember the details of what's attached where. The "regualar" LED is on "LED_BUILTIN", for instance. Would "D13" be easier to remember? Not for me!)
==================
(In Arduino-land, what many would call "a program", or "the code" is called a "sketch".)
I always start any exploration of a new Arduino with good old "Blink". It shouldn't take a moment to do if all is well... and if something gets in the way of Blink working, that "something" is pretty big, and you need to solve it now... before you try anything fancier.
Every Arduino I've ever seen comes with an LED ont the PCB, and it can be turned on or off simply by changing the state of a digital output. It is often on D13, but...
Which digital line drives the LED changes from Arduino to Arduino. For the Arduino, it is on the pin with the "LED_BUILTIN" alias.
This foreknowledge of where to find the LED is normal. But with the Wio Terminal (and some other Arduinos), a more convenient "answer" is provided. It is nice to working with a platform with certain things in one place "once and for all". (It is provided when you "set" the board-type spec in the IDE with "Tools/Board".
Note that I didn't... and don't... need to know WHERE the LED that Blink blinks is attached. I.e. which IO line it is on. I simply say "LED_BUILTIN" whenever I want to do anything with the line the LED is on. "The system" knows the number of the right line, and I don't have to remember that. (There are quite enough other things to remember, thank you!)
So... I did Blink. Nothing difficult arose. (Another reason for doing "Blink" in this case was that I was not sure if the Wio Terminal had the traditional "free for user's wants" LED. It isn't easy to see it blinking... but it does! (As listed on my "Naming of Parts" page, it is the small blue LED to the right of the USB-C cable, as you look at the "bottom side" of the Terminal. (You'd have the front side "up", to do this easily.)
Always with Blink, try changing the "on"/"off" times. Make sure that when the modified code is uploaded, the new behavior of the Arduino is what your code mandates. When making a test like that, always get yourself very clear about what you expect to see before you look at what the object under test is doing.
If you don't have a reasoned expectation of something specific, it is all too easy to see something, even something that is NOT behaving as it "should", and say, "Oh yeah. That looks about right."
When you are past just getting started with the Wio Terminal, you will of course use it's built-in screen. We'll get to that soon.
But for now, for people coming to the Wio Terminal from a sound Arduino base, the serial monitor is good.
To check that we understand other, basic things, We'll do one more sketch without using the possibly-difficult LCD.
We'll use the Serial Monitor to explore "stuff" the Wio Terminal has and can do.
We'll turn our attention to the three buttons on the top side of the Wio Terminal. They're "there". Checking them out should take very little time. I wondered whether using them be as simple as using any momentary switch on a different Arduino?
And the short answer is...
Using them wasn't any more difficult than it would be elsewhere. The only "trick" was discovering how to say "that pin", i.e. the one affected by whatever button was the object of my interest.
I found some code that used the buttons, and in that learned their aliases. (Those "names", of course, are mere constants. In the Wio Terminal, the "Blink" LED is on D13, but, as Ik said earlier, by the wonders of board management, "D13" is "put into" LED_BUILTIN for you.
I recommend that you use the aliases. If that "doesn't work", you may have made a serious mistake... ALWAYS set the sort of board you are GOING TO attach to the Arduino IDE BEFORE you attach that board. (Unless you know that it was set to the board you are going to use at the end of your last session on the development PC + Arduino, be it Wio Terminal or any other). Failure to do that could explain why, say, LED_BUILTIN was not an alias for the digital line the LED is on.
The three buttons are "on" "WIO_KEY_A", "WIO_KEY_B" and "WIO_KEY_C".
By the way: WIO_KEY_A stands for "28".. I think that's the "Arduino "D" number for the relevant pin, but I'm not sure... and it isn't important! (In some ways!)
On the schematic, the button SEEMS to be connected to SAMD pin "PC28/I12/SERCOM1.1/TRACEDATA.0" (see below)... but I could be confused, I could be wrong about this.) If you want to know the numbers associated with human-friendly aliases like these, it is a simple matter...
//determine-number-behind-alias
//vers 30 Dec 21
//started 30 Dec 21

//See https://www.wywtk.com/ardu/wioterm/wio-term-index.htm


#include"TFT_eSPI.h"
TFT_eSPI tft;

void setup() {
  tft.begin();
  tft.setRotation(3);

  tft.fillScreen(TFT_BLUE); //makes entire the screen blue

  tft.setTextColor(TFT_WHITE);//sets the text color to white
  tft.setTextSize(2);

   tft.drawString("The number is", 10, 170);
   char buffer [33];

   itoa (LED_BUILTIN,buffer,10); // << CHANGE 1st param to the alias you want number from

   tft.fillRect(265,170,320-265,16,TFT_BLUE);
   tft.drawString(buffer, 265, 170);
   tft.setTextColor(TFT_BLACK);//LS

}//setup

void loop() {
   delay(300);
}//loop
(I'll go into the whys and wherefors of using the tft library in a moment.)
Full schematics... if you know how to read them!... are available at...
https://files.seeedstudio.com/wiki/Wio-Terminal/res/Wio-Terminal-SCH-v1.2.pdf
But don't worry! We don't need them! I just get a bit obsessive sometimes. I may have this wrong... but at the moment, I think the schematic is telling me that the "Blink" LED ("LED_BUILTIN" when board is set to Wio Terminal, is on "PA15/I15/SERCOM2+4.3/TC3.1+TCC2.1+1". I don't (yet!) see how that "translates" to "Arduino D13"... but I am confident that someday I will!)
Please write, if you know where I can find a comprehensive list of what lines are used for what? Or, more usefully perhaps, which GPIO lines are NOT used, but "merely" available via the 40 way connectot. "Which GPIO lines" in terms of their "Arduino" names. (D7, A12, etc). Or how to "Translate" things like "PA15/I15/SERCOM2+4.3/TC3.1+TCC2.1+1" into "Arduino names", or aliases like "LED_BUILTIN". Contact details at end. OR is any are "dual purpose, e.g. "you can use Dxx for output, as long as you don't want to use the ABC channel at the same time".
The "hassle" of this "what pin is for what?" is not unique to the Wio Terminal... but is, perhaps, more acute because of all the extra bits... like the three buttons... which are always present.
Our first sketch was pretty pedestrian.
Try this one...
//Sketch SerialMonitorTkb
//ver 26 Dec 21
//started 26 Dec 21
//https://sheepdogguides.com/arduino/ahttoc.htm
//
//Experiement with the ordinary Arduino IDE Serial Monitor...
//https://sheepdogguides.com/arduino/aht1serimoni.htm ...
//  and using it to check out bits of the Wio Terminal.

int x = 0;

void setup() {
  Serial.begin(115200);// << See note below
  delay(500);// Give system a chance to finish Serial.begin
  Serial.println("Hello world");
}//setup

void loop()
{
  Serial.println(x);
  delay(800);
  x=x+1; // (Yes, I know there's a more clever way....
      //but this page is about the serial monitor, remember?)
  if (x>5) {x=0;
    Serial.println("Hello again world");
    };
}//loop
The code above "works", but for some reason, I can't get things right to have the "Hello world" show up every time. Changing the "delay(500);" to "delay(6000);" might help, but is not a great "answer".
Nota Bene: Whenever you are using the Arduino IDE Serial Monitor, there will be a line like...
Serial.begin(115200);
... in the code. 115200 is a widely used value for that. Another that you sometimes see is 9600.
Use 115200 if it works for you. If you get garbled "stuff" on the monitor, try 9600.
But! Whatever number you have with the "Serial.begin", you need to set the Serial Monitor dialog to the same number.
"Set the Monitor...": When you launch the monitor, in its lower right hand corner there is a pull-down with the word "baud" after a number. Use that to set the Monitor to whatever the "Serial.begin" the sketch is using.
Further information about using the Serial Monitor...
It seems to me so far... and I suspect I don't have this quite right, yet, but what I have WORKS! (^_^)...
When you compile your sketch (...or if you flick the Off/On/Reset-EnterBootloader switch down briefly, after the code has loaded to the Wio Terminal, thus resetting it...), it automatically launches.
It does the Serial.begin(115200) almost immediately. Then, with the code above, the "delay(500)" causes a half second delay before anything else happens, and THEN the line "Serial.println("Hello world");" sends that message to the Serial Monitor.
To get what I think you would reasonably expect, you must, I think...
If you continually "miss" the "Hello World", try increasing the delay(500). Try delay(6000). If you find that you have a "long" wait for the "Hello world", by all means reduce the 6000.
If you don't follow this easy- to- do / hard- to- explain procedure, the "Hello World" gets sent before the Serial Monitor is "awake/ connected", and it is just lost, never seen.
It isn't as fiddly as this with some Arduino boards, and maybe it isn't as fiddly as this with the Wio Terminal... but I was experiencing things that looked like the "Hello World" was being sent, but not received, and the procedure I've outlined WORKS. (For me!)
WHEW! Details, details. It IS a minor thing. Doing what's needed soon becomes automatic. I hope it wasn't one of those newbie gotchas for you, that you didn't waste time getting past it. The Serial Monitor is a tremendously useful tool.
I often put a Serial.begin(115200) and some Serial.println("xxx") statements into my setup() with some documentation:
-- the name of the sketch that is loaded into an Arduino
-- version information
-- what additional components the system requires
Then if I ever want to update something running in a still-in-use Arduino, or re-purpose one that is languishing in my supplies, it is a simple matter to connect it to a Serial Monitor and let it "tell me" about itself.
It doesn't need to be connected to a Serial Monitor in day-to-day use. The serial interface used doesn't use handshaking. It a case of "if an Aruduino speaks, and there is no woman within 200 miles, is it still wrong?". It doesn't "mind" "speaking" when "no one" is "listening".... UNLESS...
I briefly liked the following trick...
void setup() {
Serial.begin(115200);
while(!Serial); // Wait for Serial to be ready
Serial.println("Testing 1,2,3");
That "works". It makes the Arduino wait to send the "Testing..." until a Serial Monitor is standing by to display the message.
Alas, unless in the circumstances concerned, there will always be a Serial Monitor is standing by to display the message, the sketch will get to the "while(!Serial)", and sit there forever.
I suppose you could do something along these lines, have the best of both worlds...
((THIS CODE IS NOT PERFECT. JUST SHOWS IDEA))
void setup() {
int iTimeout = 24;
Serial.begin(115200);
while((!Serial) AND (iTimeout>0))
  {
    delay(500);
    iTimeout=iTimeout-1;
  }
Serial.println("Testing 1,2,3");
I make no apologies for the rambling nature of this tutorial. It is meant to give you insight into how to go about "getting to know" a machine.
I mentioned "finding some code".
The Wio Terminal Getting started page has a good menu for you at the left side of the page... but you have to click on headings and sub-headings to see things "under" them... For the three buttons, I used... Platform ^ (the "^" says "Click Platform to COLLAPSE it. When the "v" is up ("^"), the topic is presently shown "opened".) --- Wio Terminal ^ ---------Configurable Buttons v Click on the "Configurable Buttons v" and it will open, to show just "Overview". Click THAT, and you will get the details for the three buttons on the left of to top of he device.
======
Besides being useful in its own right. investigating the three buttons was a way to see that the serial monitor worked "as usual".
In planing the sketch, from early on I had decided that the code would include lines like...
if left-button pressed,
   then send "left-button pressed"
     to the serial monitor
---
It all went very smoothly. Here's the code for that one. It is a barely modified version of...
https://wiki.seeedstudio.com/Wio-Terminal-Buttons/
//ThreeButtonsTkb
//ver 26 Dec 21
//started 26 Dec 21
//https://sheepdogguides.com/arduino/ahttoc.htm
//
//First- getting the ordinary Arduino IDE Serial Monitor working...
//https://sheepdogguides.com/arduino/aht1serimoni.htm ... then
//using it to check out bits of the Wio Terminal.

//Useful references for building this...
//https://files.seeedstudio.com/wiki/Wio-Terminal/res/Wio-Terminal-SCH-v1.2.pdf
//https://wiki.seeedstudio.com/Wio-Terminal-Buttons/

//This is a slightly adapted version of the Seeed demo
//N.B. The "else"s in the Seeed demo might lead you to think that the
//  code can't test if two switches are pressed down at a given time. It can, as done here.

//I don't know what digital pins WIO_KEY_A, B and C are aliases for... or whether they are
//taken out to the 40 way connector... and feel that I SHOULD know, so that
//clashes where one pin is trying to serve two masters cannot be created inadvertently.

void setup() {
  #include"TFT_eSPI.h"
TFT_eSPI tft;

void setup() {
  Serial.begin(115200);
  delay(500);// Give system a chance to finish Serial.begin
  Serial.println("Hello world");

  pinMode(WIO_KEY_A, INPUT_PULLUP);
  pinMode(WIO_KEY_B, INPUT_PULLUP);
  pinMode(WIO_KEY_C, INPUT_PULLUP);
}//setup

void loop() {
  // put your main code here, to run repeatedly:
   if (digitalRead(WIO_KEY_A) == LOW) {
    Serial.println("------Right hand key pressed");
   }
   if (digitalRead(WIO_KEY_B) == LOW) {
    Serial.println("---Middle key pressed");
   }
   if (digitalRead(WIO_KEY_C) == LOW) {
    Serial.println("Left hand key pressed");
   }
   delay(200);
}//loop
Other Built in Good Stuff will have to wait for a moment... the LCD is Just Too Tempting...
Now... "Don't be Frightened", as Tevyah said.
Of course: Running the LCD will never be "simple".
But take it one step at a time, and You Can Do It!
---
https://wiki.seeedstudio.com/Wio-Terminal-LCD-Overview/
The above page is very good... and more likely to be up to date than this. Also, it is from "the horse's mouth".
What you are reading only takes you through it gently by the hand, as it was, as it worked for me.... Windows 10/ Arduino 1.8.19, 26 Dec 2021
I had no reason to reload the library.
... q-editTO BE FINISHED!...
The result of the following code (and more... we'll come to the other material in a moment) is shown just below the code...
void setup() {
  tft.begin();
  tft.setRotation(3);

  tft.fillScreen(TFT_BLUE); //makes entire the screen blue

  tft.setTextColor(TFT_WHITE);//sets the text colour to white
  tft.setTextSize(1);//sets the size of the text
  //Screen is 320x240
  tft.drawString("Hello world!       2---------3---------4---------5", 10, 0);
  tft.drawString("2nd line. Y position 10 greater than lst line'a -5", 10, 10);
  tft.setTextSize(2);
  tft.drawString("Press some of the buttons", 5, 30); //prints strings from (0, 0)
  tft.drawString("on the top side...", 40, 50); //prints strings from (0, 0)

  tft.setTextSize(1);

  tft.drawString("Bottom line. 225 used for Y value.", 10, 225);
  tft.drawString("229", 43*6, 229);
  tft.drawString("231", 47*6, 231);
  tft.drawString("233", 51*6, 233);
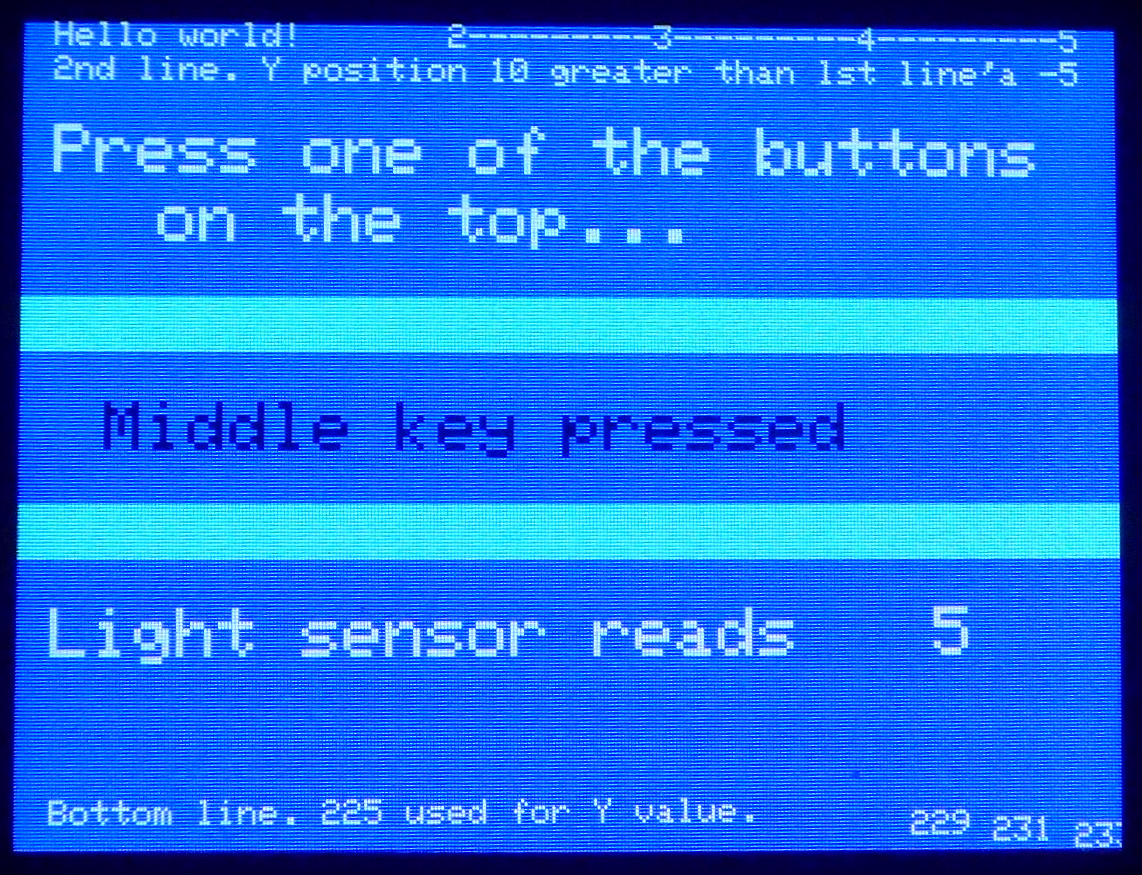
(That is a bit of a "jumble", I admit. Ignore the things in the larger font for now. (Ignore "Press...", "Middle Key...", "Light sensor...")
Notice the text at the bottom of the Wio Terminal LCD, and the first two lines on it. ("Bottom line... 229 231 232", "Hello... ---5", and "2nd line...")
These demonstrate that using the smallest built-in font, 50 characters are posible per line. (Umm.. 51, actually. (I put a 10 pixel left margin on those lines.))
And that after tft.setTextSize(1), more than 20 lines of such text are possible.
And you can "mix" text of different sizes on the screen. Later you will learn that you can also, again concurrently, do graphics.
Still at textsize=1: n*6 will put you at the horizonatal place for the nth character in the line, calling the 1st position the "zeroth", as geeks are prone to do. 52*6 (312) is the highest useful "x" value to use.
The highest sensible Y coordinate for a tft.drawstring command seems to be 232. (And that is only sensible if you are "drawstringing" just a single character, at textsize=1)
If you use a "too big" value, there is no wrap around. The text is "just lost".
The "background" is not "printed" when a character is printed. Printing a comma (",") affects very few pixels. (This can be useful... print an "+" and a "X" at the same place, and you will have an 8 armed "star"!)
Here is the rest of the sketch which demonstrated the tiny text, and generated the screen seen above.
The middle button was pressed at the moment the picture was taken. When it wasn't pressed, the "Middle Key Pressed" text vanished.
The sketch I was using when the image was made was very slightly different from what you see below. The code below puts slightly different tiny text in the lower right hand corner, and it provided the cyan back-ground to "Middle key pressed", the background that is missing from the image.
//SimpleLCDTkb
//ver 1 Jan 22
//started 26 Dec 21
//https://sheepdogguides.com/arduino/ahttoc.htm
//
//First steps with Wio Terminal LCD...
//See also, very good: https://wiki.seeedstudio.com/Wio-Terminal-LCD-Basic/

//This is a slightly adapted version of the Seeed demo combined with something else.

//I don't know what digital pins the LCD tie up... or whether they are
//taken out to the 40 way connector... and feel that I SHOULD know, so that
//clashes where one pin is trying to serve two masters cannot be created inadvertently.

//Besides showing how to write to the LCD, this also shows how to read the light sensor
//Light sensor lines marked ""

//See also http://wywtk.com/ardu/wioterm/wio-term-first-steps.htm

#include"TFT_eSPI.h"
TFT_eSPI tft;

void setup() {
  tft.begin();
  tft.setRotation(3);

  tft.fillScreen(TFT_BLUE); //makes entire the screen blue

  tft.setTextColor(TFT_WHITE);          //sets the text colour to white
  tft.setTextSize(1);                   //sets the size of text
  //Screen is 320x240
  tft.drawString("Hello world!       2---------3---------4---------5", 10, 0);
  tft.drawString("2nd line. Y position 10 greater than lst line'a -5", 10, 10);
  tft.setTextSize(2);
  tft.drawString("Press one of the buttons", 10, 30); //prints strings from (0, 0)
  tft.drawString("on the top...", 40, 50); //prints strings from (0, 0)

  tft.setTextSize(1);                   //sets the size of text
  tft.drawString("Bottom line. 225 used for Y value.", 10, 225);
  tft.drawString("229", 43*6, 229);
  tft.drawString("AyC", 47*6, 224);
  tft.drawString("A", 47*6, 232);
  tft.drawString("B", 48*6, 232);
  tft.drawString("C", 49*6, 232);

  tft.drawString("+", 52*6, 233);
  tft.drawString("2", 52*6, 233);

  /*See also http://wywtk.com/ardu/wioterm/wio-term-first-steps.htm

  It would seem that using the smallest built-in font, 50 characters
     are posible per line. And that more than 20 lines of such text are
     possible. (Umm.. 51. (I put a 10 pixel left margin on those lines.)
     (You CAN put the lines only 8 pixels apart (vertically), and still
     have a line of unused pixels between them. The build-in smallest
     font is mono-spaced. Descenders gonly go down into the one row of pixels
     which would be background-color if you used ALL CAPS. Or increase the
     y coor by 9 each time, and still have at least one line of pixels between
     the rows of text. Or make life easy for yourself, and use 0, 10, 20, etc!

  The highest sensible Y coordinate for a tft.drawstring command seems to be 233.

  n*6 will put you at the horizontal place for the nth character in the line,
     calling the 1st position the "zeroth", as geeks are prone to do. And 52*6
     being the highest useful "y" value to use.

  If you use a "too big" value, there is no wrap around. The "background" is not
     "printed" when a character is printed. (In other words, for example,
     printing a comma (",") affects very few pixels. (This can be useful...
     print an "+" and a "X" at the same place, and you will have an 8 armed
     "star".
*/


  tft.setTextColor(TFT_BLACK);

  pinMode(WIO_KEY_A, INPUT_PULLUP);
  pinMode(WIO_KEY_B, INPUT_PULLUP);
  pinMode(WIO_KEY_C, INPUT_PULLUP);

  pinMode(WIO_LIGHT, INPUT);

  tft.setTextSize(2);

}//setup

void loop() {

   tft.setTextColor(TFT_BLACK);

   if (digitalRead(WIO_KEY_C) == LOW) {
    tft.drawString("Left hand key pressed", 10, 80);}
   else {
    tft.fillRect(0,80,320,16,TFT_CYAN);}
   //Change all of the "CYAN"s and "GREEN"s to "BLUE", to see something
   //  some would call nicer... but get the positioning of the
   //  fillRects, which serve to "erase" text, right... while
   //  you can SEE WHERE the rectangle is going... which becomes
   //  harder if you are drawing a blue rectangle on a blue screen!
   //
   //You can use 255 in place of TFT_BLUE. 255*256 gives a yellow.
   //  In other words, you can use numbers to specify colors. I
   //  don't (yet) know the method in the madness.
   //Found key!... https://wiki.seeedstudio.com/Wio-Terminal-LCD-Basic/
   //  Seems that there are 5 bits per primary... as a binary, "White" is...
   //   B111111111111111
   //   Brrrrrgggggbbbbb
   //By that rule, green "should" be....
   //   B000001111100000
   //... which in hex is...
   //   0x3E0
   //And that does give a green... sort of. (A weird green, different from the
   //  good green "TFT_GREEN" gives. At the same page (cied above) that says the
   //  the Wio Terminal uses 16 bit color, with 5 bits each for R,G,B, it also
   //  says that the hex equiv of TFT_Green is 0x07E0... B0000011111100000...
   //Maybe "the rule" is that the most sig bit is always a "1"? (The 3x5 rule
   //  doesn't say what to do with the most significant bit. Not all of the
   //  examples make the most significant bit zero.) Sigh. Maybe stick to the 18
   //  named colors provided? (Do the easy thing? Moi?)

   //Somewhere out there in internetland someone's done a color picker!...
   //And a full answer to convering colors to numbers for the Wio Terminal
   //Please write (see wywtk.com) and tell me where it is!!


   if (digitalRead(WIO_KEY_B) == LOW) {
    tft.drawString("Middle key pressed", 25, 110);}
   else {
    tft.fillRect(0,110,320,16,TFT_CYAN);}

   if (digitalRead(WIO_KEY_A) == LOW) {
    tft.drawString("Right hand key pressed", 40, 140);}
   else {
    tft.fillRect(0,140,320,16,TFT_CYAN);}

   int lightSensorReading = analogRead(WIO_LIGHT);

   tft.setTextColor(TFT_WHITE);
   tft.drawString("Light sensor reads", 10, 170);

   char buffer [33];
   itoa (lightSensorReading,buffer,10);
   tft.fillRect(265,170,320-265,16,TFT_BLUE);
   tft.drawString(buffer, 265, 170);


   delay(300);
}//loop
N.B.: The lines like...
tft.fillRect(0,140,320,16,TFT_CYAN);
"Erase" a rectangle of the LCD, preparing that area for some new text there. (If you didn't execute those lines, you would see what in "the good old days" you got with a Typewriter (ancient mechanical device for putting writing in ink on paper) if you typed two or more lines on top of one another, at the same place on the sheet of paper you were typing on.
(The light sensor is on the PCB, and if the transparent panel on the back of the Wio Terminal can see light, the sensor tells you how bright the light is.)
In setup()...

   pinMode(WIO_LIGHT, INPUT);


In loop()...

   int lightSensorReading = analogRead(WIO_LIGHT);
     //creates variable lightSensorReading,
     //  and fills it with a value from the sensor

     char buffer [33];
	    itoa (lightSensorReading,buffer,10);
	    tft.fillRect(265,170,320-265,16,TFT_BLUE);//Clear the area the value will be "printed" on.
	    tft.drawString(buffer, 265, 170);
I hope that the above has left you feeling confident about the Wio Terminal? About going further with learning to use it?
One step in that process would be to learn how to use the other built-in "bits". Most are sensors or output devices. (e.g. the piezo wafer. It isn't a self oscillating buzzer... you have to turn the right output bit on and off in a stream in the range of frequencies humans can hear... but with the chip capable of doing such things without direct coding for each "on" and "off" ("analog pulse-width modulation(PWM) output")... see Seeed "Getting Started with Buzzer" tutorial), it isn't hard.
There's a microphone. There's an infra-red LED (940nm)... you could turn the Wio Terminal into a remote control for your TV, etc! (Or do even more cool things if you set up a second Arduino with an IR phototransistor, and use that to take commands from the Wio Terminal. "Wio- turn on the lights"! (Well, a la Ms 'Lexa might be pretty ambitious... but via the Wio Terminal with it's 8 buttons, quite easy.
The socket for an SD card opens up lots of possiblilities. You can both read from and write to the card. I would suggest starting with the former. Be sure you understand about "un-mounting" it when you start writing to the card.
The Bluetooth and WiFi capablilites are, it seems, beyond me for the moment. I know little about Bluetooth, and have funked that entirely. I know quite a lot about WiFi and making webservers, but after three days of effort I am for the moment defeated. If you can get the webserver example working, please contact me? (Remeber that at 1 Jan 2022, the Seeed website advises "wireless connectivity is only currently supported by Arduino."
The LIS3DHTR you will see mentioned in the Seeed documentation. It is "just" another sensor that is "built in". It senses accelleration in three axes. This has a number of cool uses. It allows the Wio Terminal to know which way is "down". It could be used to make a tool for evaluating your driving. If you corner badly, or brake hard, or stomp on the accellerator, you will create accelleration, and the LIS3DHTR could measure, record, evaluate it. It can also tell if you are speeding up or slowing down. I don't know if it has the resolution to build a "cruise speed" advisor around. Might be fun to try!
=========
At https://wiki.seeedstudio.com/Wio-Terminal-Getting-Started/#wio-terminal-classroom there are some links to various video tutorials which give you "getting started" info on many, many of the "bits" that make up the Wio Terminal.
About 2/3rds of the way down https://www.seeedstudio.com/Wio-Terminal-p-4509.html, on the right hand side, there are links to a whole bunch of fun and useful things people are doing with the Wio Terminal.
There's a huge archive of Good Stuff at... https://github.com/Seeed-Studio/Seeed_Arduino_Sketchbook/releases/tag/v1.0.2... and you can use your ordinary OS tools and browser to download the archive as a zip, pick and choose from what's there. (Just move whole folders to a place of your choosing, dbl click on any .ino file that looks promising.)
That pretty well at least mentions all the built-in stuff.
But your can connect MORE via the 40 pin connector on the bottom of the Wio Terminal! For the pin assignments there, see...
https://wiki.seeedstudio.com/Wio-Terminal-IO-Overview/
That page includes the innocent little line "To use them, simply use the defined pin names as above! Some pins are multi-functional so can be referenced by different ways".
Beware... there may be pins on the connector that also connect to things inside the Wio, "built in" things. So you may have to, say, not use the SD card reader if you want to use pin.... 123?... for an input. And it may be that a pin used by one of the built in modules cannot be used for input or output, but only for one of them.
(See my Naming of Parts)
There are probably hundreds of devices that can be plugged in this way.
"Grove" is like a "brand". It is one "system" of connecting I2C devices. And if you can connect a Grove device, you can also connect, with nothing fancier than a passive adapter cable, Sparkfun Quiik, Adafruit StemmaQT (but not "Stemma") devices.
The world of I2C devices and your Wio Terminal will be the subject of my next webpage.
Please get in touch if you discover flaws in this page. Please cite the page's URL. (http://wywtk.com/ardu/wioterm/wio-term-first-steps.htm).
If you found this of interest, please mention in forums, give it a Facebook "like", Google "Plus", or whatever. If you want more of this stuff, help!? There's not much point in me writing these things, if no one feels they are of any use.
|
Unlike the clever Google search engine, this one merely looks for the words you type, so....
* Spell them properly.
* Don't bother with "How do I get rich?" That will merely return pages with "how", "do", "I"....
Please also note that I have three other sites, and that this search will not include them. They have their own search buttons.
![]() Page has been tested for compliance with INDUSTRY (not MS-only) standards, using the free, publicly accessible validator at validator.w3.org. Mostly passes.
Page has been tested for compliance with INDUSTRY (not MS-only) standards, using the free, publicly accessible validator at validator.w3.org. Mostly passes.
AND passes...

....... P a g e . . . E n d s .....