No "rocket science" here... but it may help you understand my comments elsewhere, and it may satisfy your curiosity on some things. Not least it pins down what I mean by "the front" of the Wio Terminal, and what I call "the right way up".
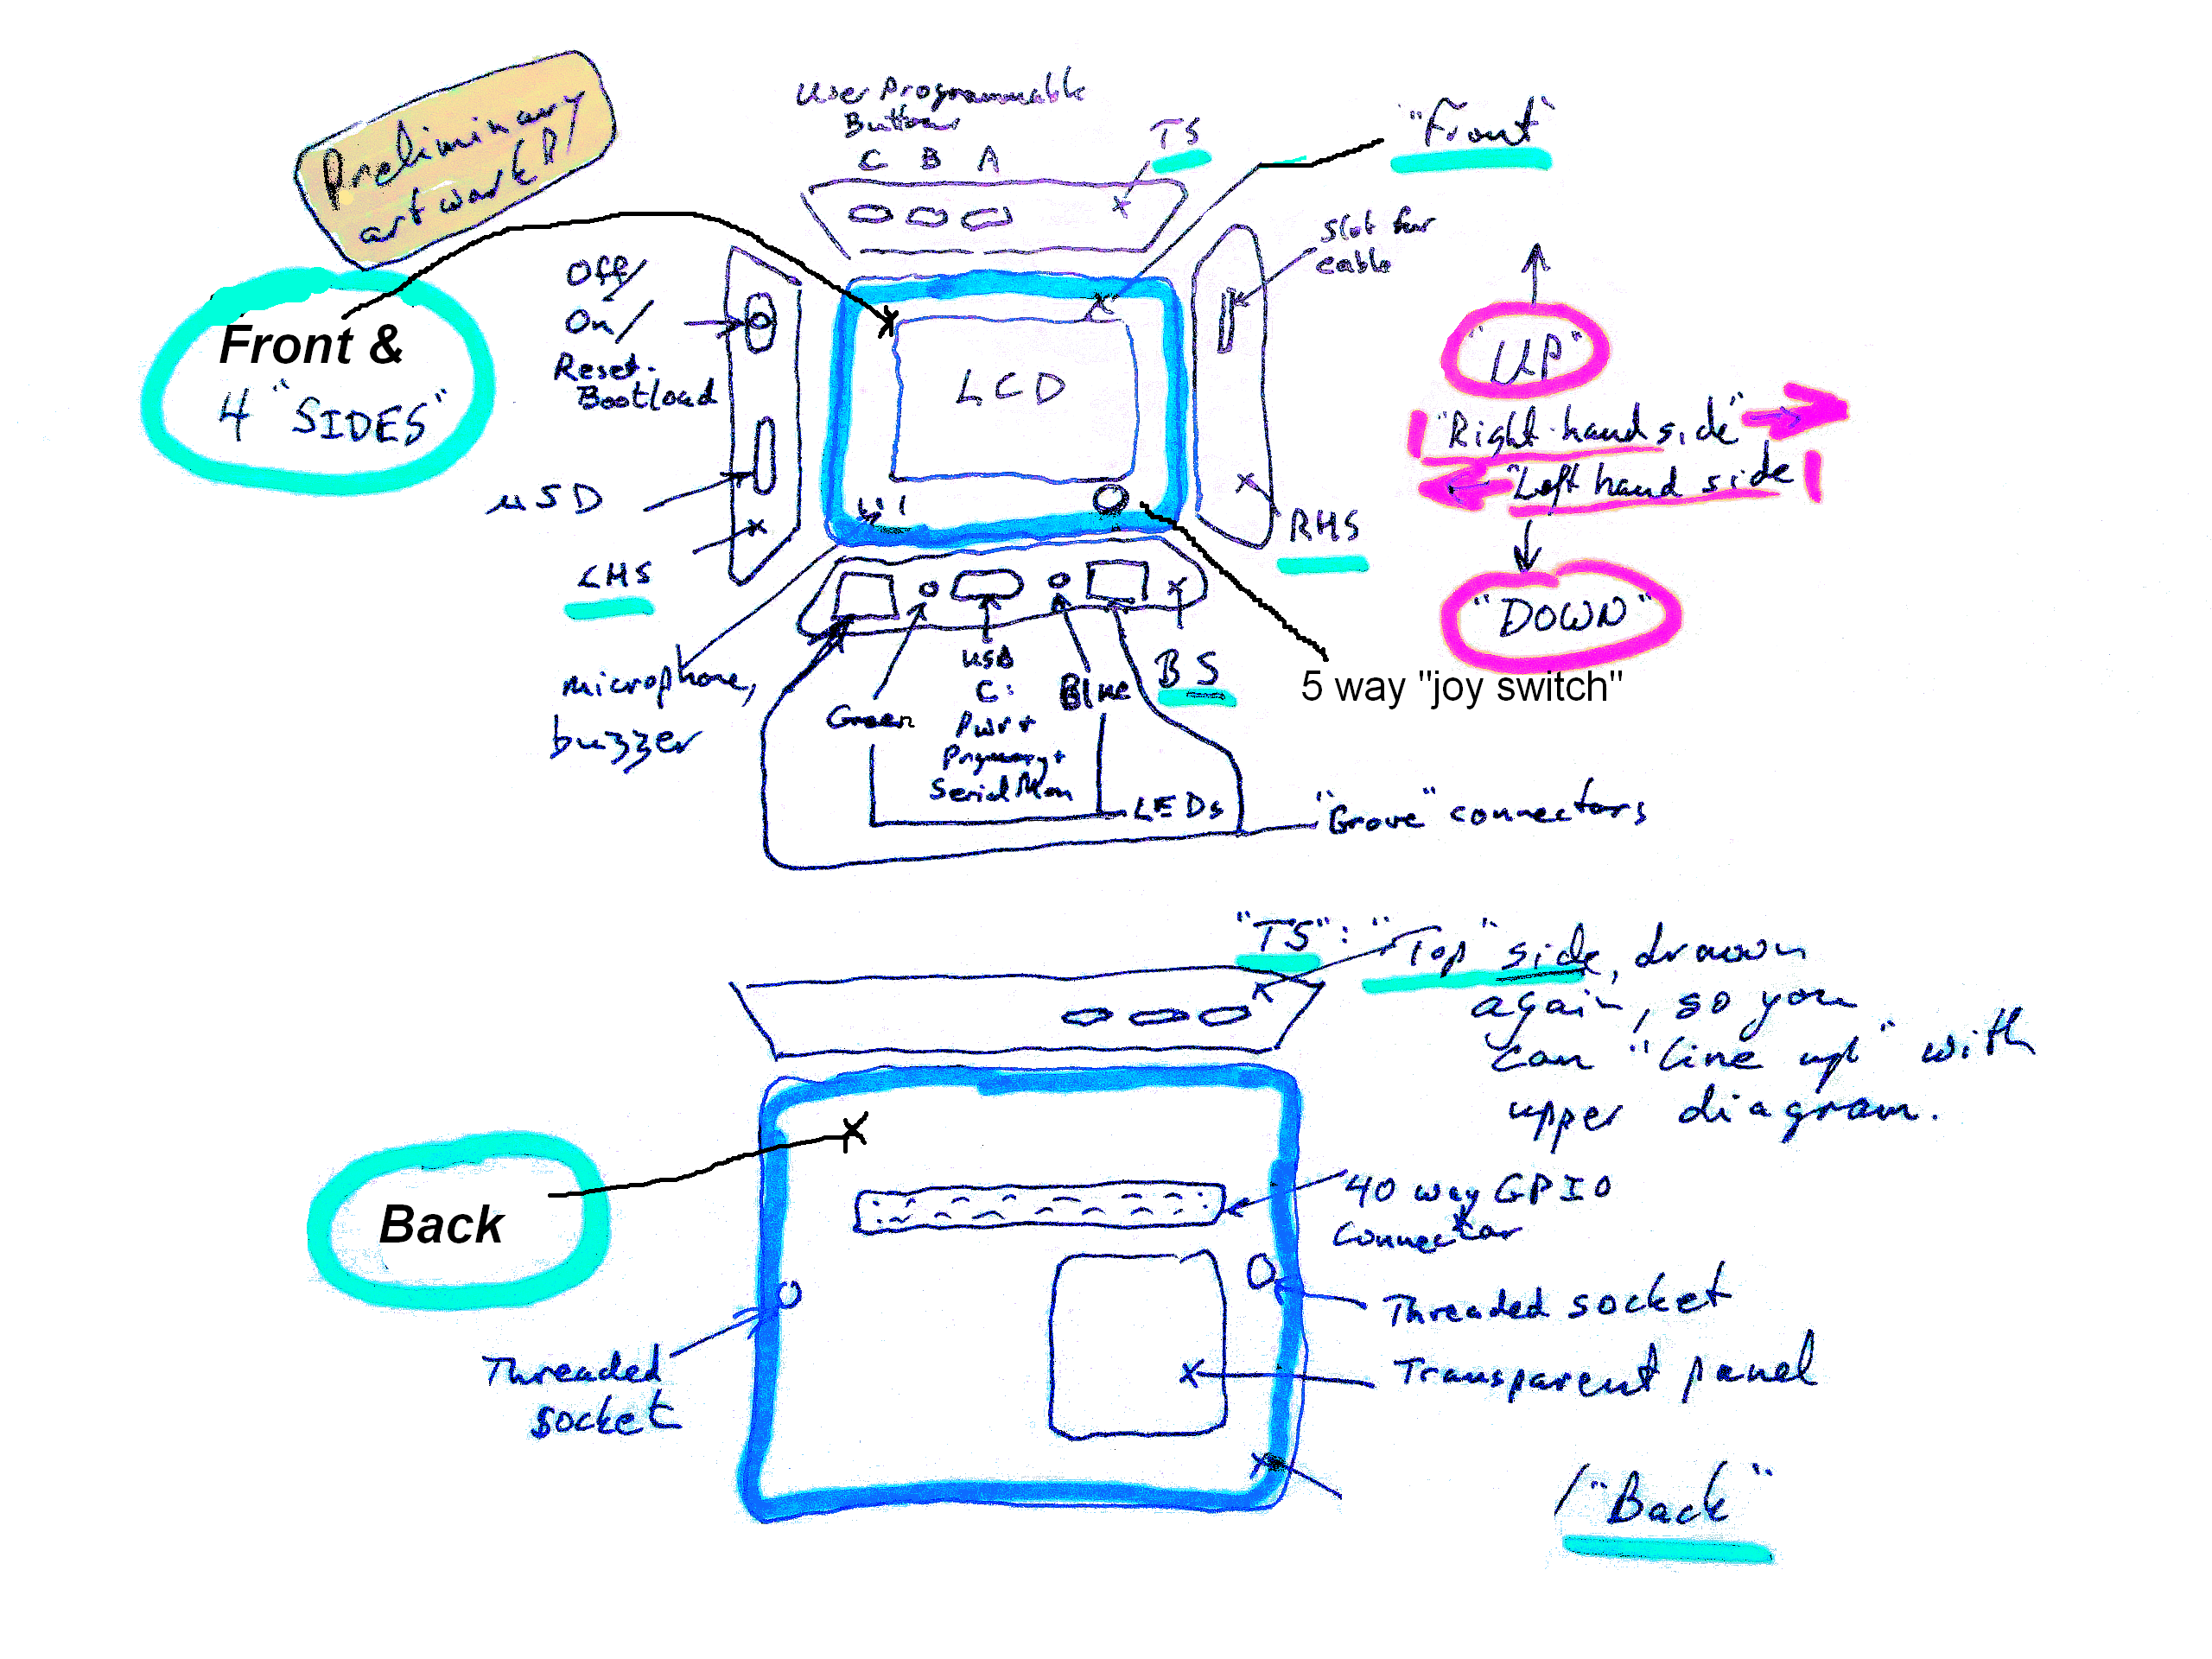
Starting with the "Top" or "Upper" side of the Wio Terminal, on the "top SIDE (TS)", we find...
3 buttons. They depress some momentary switches, taking a digital line to it's other state when pressed. In your code, you only need...
pinMode(WIO_KEY_A, INPUT_PULLUP);
... in your setup() and...
if (digitalRead(WIO_KEY_A) == LOW) {
   Serial.println("Right-hand user programmable button pressed");
...in your loop(), and all will Just Work.
"WIO_KEY_A" is a constant you can use without any fuss. There are many such.
RHS- Right hand side: The "slot for cable" is there, if you want it. It could also serve as a way to attach a loop of cord, to make a "handle" for the Wio Terminal. I doubt many will feel the need of it.
BS- Bottom side, from right to left, to continue our "direction of march"...
The first of two "Grove" connectors. These are for modules in the "Grove" system range: Useful things that interface via I2C. With very little trouble you can also use them for the similar Sparkfun "Qwiic"/Adafruit "StemmaQT" (which is different from their "Stemma"!) range. Between them, there are probably hundreds of goodies you can easily add to your Wio Terminal to meet whatever needs your project has. Sensors and output devices... from $2 to $200! The Terminal has two of these, but the devices can also be daisy-chained, if the devices in question allow you to set their I2C addresses.
Next: A Blue LED. You can turn this on and off. It is the LED that the basic "Blink" demo will affect. System name: "LED_BUILTIN"... and you don't have to think about "the resistor".
Next: The USB-C connector. It supplies the Wio Terminal with its power. When you program it, the code will go in through this. Once it has been programmed, you can use it to send data to the serial monitor... a very useful thing, by the way. I'm pretty sure that you can also get the Wio Terminal to act like, say, a USB keyboard. (Be a HID device. and other USB things. See the Hobbytronics range of such things for ideas.).
Next: A Green LED- it merely "says" whether the Wio Terminal has power. Speaking of power, you can get a battery pack that is nicely integrated with the Terminal. Useful and necessary... but pretty pedestrian compared to all the other things.
And finally, for the bottom side: A second Grove/QWiic/StemmaQT connection.
At the bottom, the slot for the microSD card you can put in... either to supply data to the device, or as a place where the device can write data. Think configuration files, images, data.
Then a very clever switch.
Push it up, and it will stay there, and the device will be disconnected from any power that the USB-C connector may be providing to it.
Carefully slide it down to the middle position, and all of the device will get whatever power the USB-C connector is supplying, i.e. you turn it on, if plugged in.
If you slide the switch all the way "down" (as close the microSD slot as it will go), you will reset the device as soon as you release the switch, at which moment it will "spring" back to the middle position. As a "power on" provokes a reset anyway, it really doesn't matter if you slide the switch too far as you switch it on.
Flick the switch fully down twice in rapid succession, and you will put it into "Bootloader" mode. This is nothing to do with re-flashing the underlying firmware. It is "just" making it receptive to new code from the Arduino (or other programming) IDE. You won't always need to do this... sometimes just telling your IDE "Okay, send that to the Wio Terminal" is enough. But if the Terminal is "inspecting its navel, lost in a loop", you can break it out of the loop as described.
Here we find a transparent panel. It is fun, if you are one of the Right Thinking... but it is also there for two reasons...
There is a light sensor on the exposed PCB. And there is an IR LED. (You could make the WIO Terminal into a replacement for your TV remote control!)
There are two threaded sockets, for first class mechanical connections to other things... if the magnets in the case aren't adequate for your wants!
And there is a 40-way connector that looks remarkably like the one that Raspberry Pi's use... which is no coincidence. The Wio Terminal "plays nicely" with Pi's.
The LCD is remarkably capable for a "small" LCD. The smallest font is very clear, and would allow... I haven't done the sums... 25 lines of 50 characters? Or rather nice, crisp, graph lines. Or a mix!
Also on the front, lower right, the "joy-switch". It really just 5 digital inputs, detecting if the joy-switch is pressed, parallel to the front of the Terminal, up, right, down, or left. AND if you press the button towards the Terminal, i.e. "down" in a different sense, that makes a different input change state.
And, lower left: A small grill... to allow sound IN to the microphone there, and OUT from the piezo wafer. It isn't self oscillating, but the Arduino inside is more than capable of generating a stream of pulses, of course.
We've only scratched the surface of what a Wio Terminal has in the above tour. But the temperature sensor, accelerometer, WiFi, etc, etc, etc... are stories for elsewhere.
Please get in touch if you discover flaws in this page. Please cite the page's URL. (http://wywtk.com/ardu/wioterm/wio-term-naming-of-parts.htm).
If you found this of interest, please mention in forums, give it a Facebook "like", Google "Plus", or whatever. If you want more of this stuff, help!? There's not much point in me writing these things, if no one feels they are of any use.
|
Unlike the clever Google search engine, this one merely looks for the words you type, so....
* Spell them properly.
* Don't bother with "How do I get rich?" That will merely return pages with "how", "do", "I"....
Please also note that I have three other sites, and that this search will not include them. They have their own search buttons.
![]() Page has been tested for compliance with INDUSTRY (not MS-only) standards, using the free, publicly accessible validator at validator.w3.org. Mostly passes.
Page has been tested for compliance with INDUSTRY (not MS-only) standards, using the free, publicly accessible validator at validator.w3.org. Mostly passes.
AND passes...

....... P a g e . . . E n d s .....