In putting together systems... be they an Arduino to water a plant, or a jet fighter, designers use modules and standard protocols.
Study CAREFULLY: https://wiki.seeedstudio.com/Wio-Terminal-IO-Overview/
... and ...https://learn.adafruit.com/introducing-adafruit-stemma-qt/technical-specs
It seems that the "2 Grove Ports" on the Wio Terminal do NOT have the same circuits, inside the Wio Terminal. (Not only do they connect to different pins on the processor, the WAY they are connected is different.)
Can they BOTH be used for I2C??? At this point... I DON'T KNOW
It just makes life more manageable.
In the world of microprocessors, e.g. Arduinos and many others, sensors and actuators are important.
And sometimes a given microprocessor may need to connect to several sensors, not just a single one. One or many sensors, or actuators, or a mix of them.
One "protocol" (system) for this is I2C. It isn't very successful over long distances, but for devices near to the microprocessor, it can work well. And the marketplace has responded- many sensors come in a "package" that "just plugs in". And one really nice thing is that it uses very few data lines.
I am shoe-horning this new material into the old. The stuff in this section may be less learned, but it WORKS!
The first problem is that I don't really know enough about "Grove"/"Qwiic"/"Stemma... QT and other"... and I2C!
---
Beware voltage levels! Until you know enough to stop being dangerous, stick to 3v3 throughout... processor and I2C devices. (Sometimes you CAN mix 5v and 3v3 processors and/or sensors/actuators... but that is NOT "a given". It is a "bonus", allowed in SOME circumstances.
---
However, my novice status freely admitted, I do know a bit. I have even made I2C things work! The following is based on something I did, something that worked...
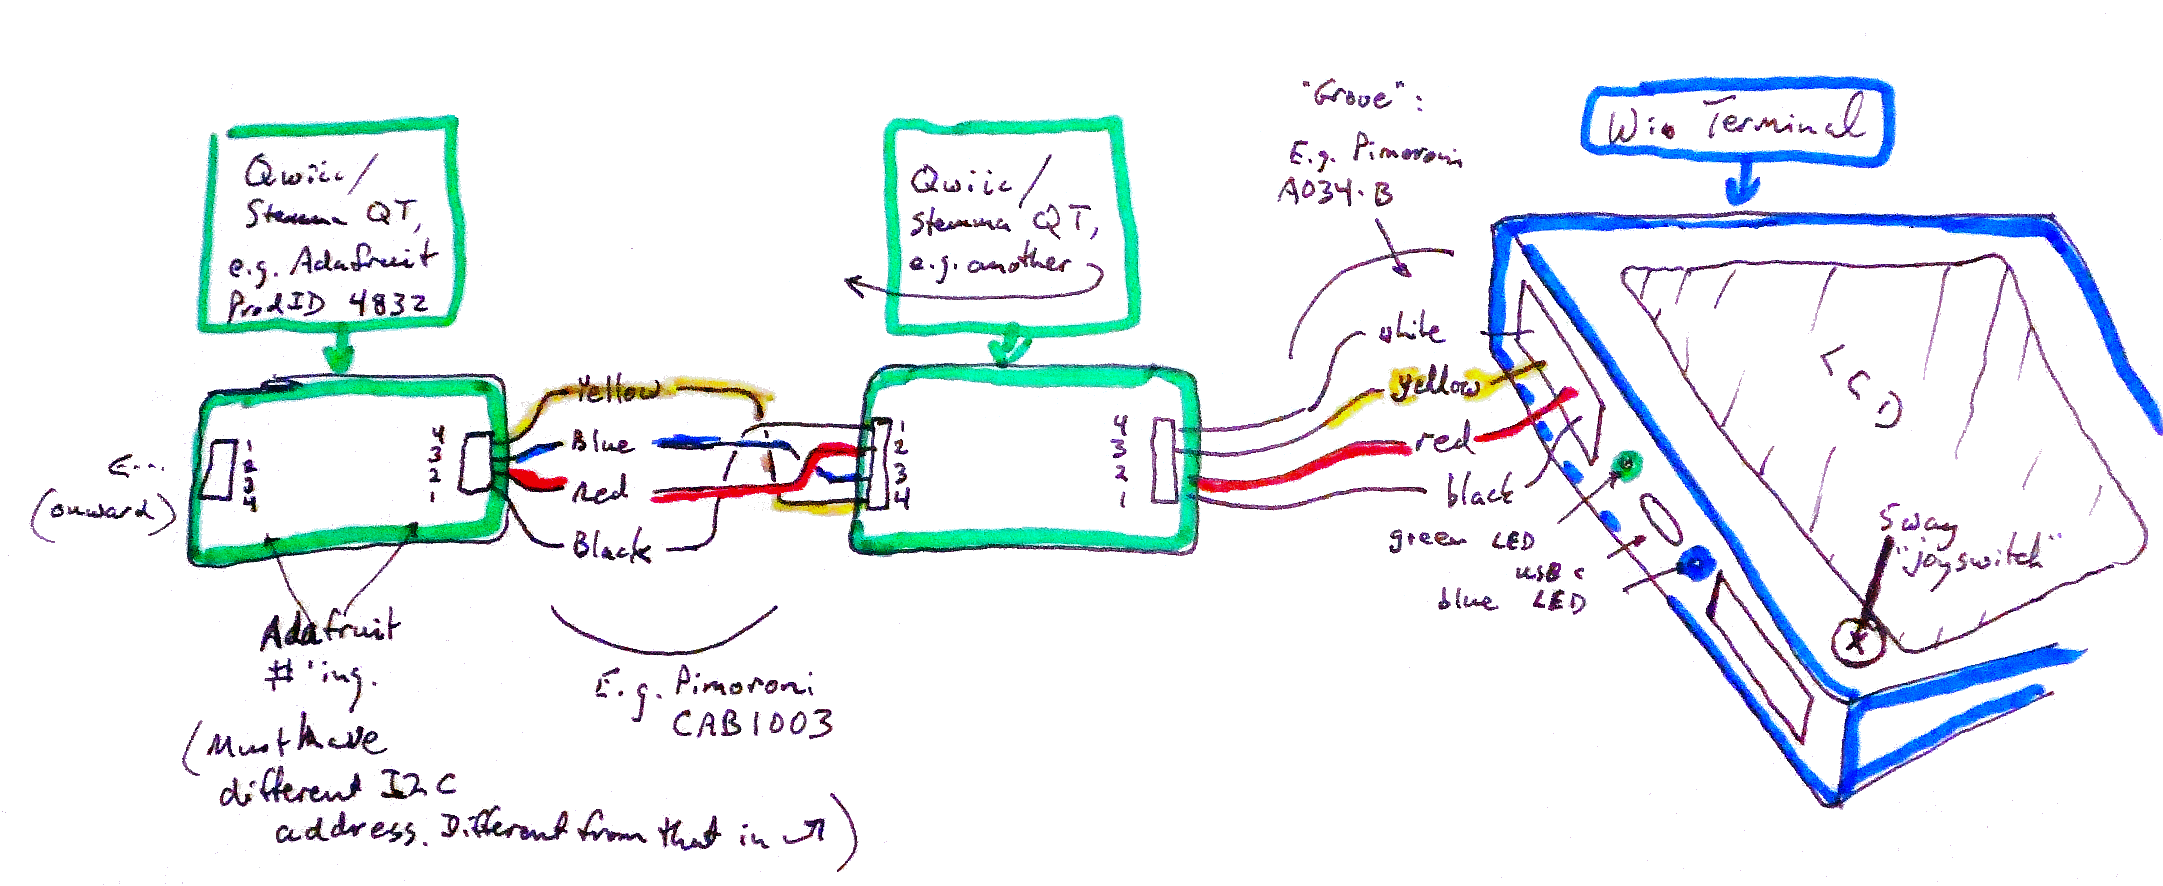
The colors in the wires are, of course, whatever the manufacturer uses. There may be "standard" colors... but maybe the manufacturer didn't read the book?
The diagram shows two I2C devices on a Wio Terminal. Note: To do this, the devices must "have" different I2C "addresses". In the case of the Adafruit 4832 (A rather nice temperature/ humidity sensor), you can "alter" the address of a given instance of the product with a drop of solder on the right bit of the PCB.
Digression...
If you put a voltmeter across the red and black wires at the Wio Terminal, or across them on anything "downstream", you should see 3v3, with the red wire +ve. **Absence**, or **WORSE: reversal** of that is Not Good.
I can't tell you what you'll see if you put a voltmeter on either of the other lines. I think one of them is an input to the Wio Terminal (or other I2C controller) and the other is an output from it. (Use "the black wire" for the other side of voltage measurements.)
(Admission... at the time of writing, I haven't tried TWO I2C devices on a Wio Terminal. I've done it elsewhere. I've had one Adafruit 4832 working on a Wio Terminal. I am confident that what I've drawn would work.)
Working from RIGHT to left...
I've plugged my I2C daisy chain into the Grove socket shown. Seeed documentation shows that the circuits behind the two sockets is DIFFERENT. I don't know that you can use either one for I2C stuff. I suspect that the one I used is the one named "J4" at the Seeed page jut mentioned. Maybe by the time you read this, a forum.seeedstudio.com discussion will have answers.
And there's another resource for us "Grove" newbies is available from Seeed... Introduction to Grove.
So many possibilities! So few hours!
I've seen the connector for the Grove socket described as "proprietary", by the way. (In www.tomshardware.com article, cited later.) Look for "Grove cables", and you should be okay.
I made my own cable for...
You can Just Buy (Sparkfun) "Grove to Qwiic/StemmaQT cables". (And I'm sure others sell them, too.) But check they are doing what you want when you get them!
The other cable, the one to the left, the one between the two Adafruit 4832s, I bought as you see it. (Pimoroni, CAB1003)
Getting the cables right MATTERS. It isn't hard, I suppose. Maybe I worry too much. But... are they "straight through" cables? Or do they "flip over" the sequence of wires? Etc? Has to be right! What's in the diagram WORKS.
Having figured out how to plug the bits together, I then needed some software.
So far, I've just established that all is well. I used...
#include <Adafruit_Sensor.h>
#include <Adafruit_BusIO_Register.h>
#include <Adafruit_I2CDevice.h>
#include <Adafruit_I2CRegister.h>
#include <Adafruit_SPIDevice.h>

/***************************************************
  This is an example for the HTU31 Humidity & Temp Sensor

  Designed specifically to work with the HTU31 sensor from Adafruit
  ----> https://www.adafruit.com/products/4832

  These displays use I2C to communicate, 2 pins are required to
  interface
 ****************************************************/

#include <Wire.h>
#include "Adafruit_HTU31D.h"

Adafruit_HTU31D htu = Adafruit_HTU31D();
uint32_t timestamp;
bool heaterEnabled = false;

void setup() {
  Serial.begin(115200);
  while (!Serial) {
    delay(10); // wait till serial port opens
  }
  Serial.println("Adafruit HTU31D test");

  if (!htu.begin(0x40)) {
    Serial.println("Couldn't find sensor!");
    while (1);
  }
  timestamp = millis();
}

void loop() {
  sensors_event_t humidity, temp;

  htu.getEvent(&humidity, &temp);// populate temp and humidity objects with fresh data

  Serial.print("Temp: ");
  Serial.print(temp.temperature);
  Serial.println(" C");

  Serial.print("Humidity: ");
  Serial.print(humidity.relative_humidity);
  Serial.println(" \% RH");

  // every 5 seconds
  if ((millis() - timestamp) > 5000) {
    // toggle the heater
    heaterEnabled = !heaterEnabled;
    if (heaterEnabled) {
      Serial.println("Turning on heater");
    } else {
      Serial.println("Turning off heater");
    }
    if (! htu.enableHeater(heaterEnabled)) {
      Serial.println("Command failed");
    }

    timestamp = millis();
  }

  delay(500);
}
... which was available via my Arduino IDE from "File/ Examples/ Examples from Custom Libraries/ Adafruit HTU31D Library...htdu31d" after I had gone through a mildly tedious "install" process... which I will now recap for you.
I was disappointed that at Adafruit's product page there was only a Youtube, and that was more about why it was a neat product than about how to use it. (It IS a neat product, and I recommend the video... for learning about that. But it won't help you USE it.)
Happily, Google search ("Adafruit 4832 library") knew where I needed to go, even if as far as I saw Adafruit didn't want to tell me! You need...
https://github.com/adafruit/Adafruit_HTU31D
After only a little bit of my usual GitHub fumbling, I managed to download the zip: Adafruit_HTU31D-master.zip. Used "Sketch/ Include Library/ Add Zip Library" (at top, you may need to scroll menu) to "add" ("install") what was in the .zip to my Arduino IDE.
Now the IDE had a new entry for including libraries in sketches: "Adafruit HTU31D Library".
It also gave me, under "File/ Examples/ Examples from Custom Libraries/ Adafruit HTU31D Library...htdu31d"
Which was a nice, simple, just used Serial Monitor demo of how to use the device. (Shown above.)
It almost compiled. Complained that the Adafruit_BusIO_Register library was needed. Went off to Google, found that..
https://github.com/adafruit/Adafruit_BusIO
Fetched, installed Adafruit_BusIO-master.zip
---
Then similar for "Adafruit Sensor" library.
Found at
https://github.com/adafruit/Adafruit_Sensor
Adafruit_Sensor-master.zip
(When I went to Sketch/ Include, I was initially thrown by the fact that the Adafruit_Sensor entries weren't with the other Adafruit entries, and that the name was slightly different... "Adafruit Unified Sensor", AND it appears in the code as "#include <Adafruit_Sensor.h<")
Ah well.
But this time it compiled, and ran as expected! (^_^) (Sending tture and humidity readings to the Serial Monitor! Hurrah! Breath gently on the sensor, watch the humidity soar!
So! I don't understand it all "properly"... but I can make it work! And the world of I2C is huge. It isn't only sensors. For instance, you can "connect" (and drive!) eight 15 segment alphanumeric LEDs for $23 (12/21, excl tax, p&p) for the "trouble" of plugging in one cable, using two data lines! (or 16 characters, if your project can justify the expense.)

I will try to get back to this page one day. Even though is it a bit of a poor relation at the moment, don't hesitate to let me know if anything I said confused you, or if what I said needs "just one more bit" to make it useful for the next poor fellow geek struggling with the first part of this learning curve.
There are two considerations...
--- 1) the physical: What wires are needed, what shape and size will the plugs and sockets be.
--- 2) the electronic: What voltages will be involved, what "codes" will be "spoken" between the microprocessor and the attached device.
When something is sold as an I2C device, the vendor is saying it will be okay in an I2C environment.
In some ways, using I2C devices is a bit like using networked devices. If all the details are right, you can string several I2C modules together, daisy-chained, all sharing one set of wires for communication between the sensors/ actuator and controller (or master, i.e. in the context of these pages, the Arduino. Many other microprocessors can "talk to" and manage I2C devices and "networked" chains of them.
I'm a hobbyist. I buy from places like Sparkfun, Adafruit, Seed. And each sell I2C devices.
They have developed three lines of I2C devices...
Adafruit also offers a "StemmaQT/Qwiic comparison".
Some I2C devices are 3v3 only. Others have circuitry to allow mixing 5v and 3v3 volt devices. Be very careful on this front. If in doubt, work exclusively with 3v3, until you know more.
If in doubt, stick to one or another of the systems until you know more.
Adafruit has been particularly unhelpful, with three different things with "Stemma" in the name.
There are some "Stemma" devices with only three wires in the connecting cables. We can "cross them off" of our list right now... they aren't I2C devices.
Then there are the Adafruit "Stemma" devices, and the "StemmaQT" devices. The latter are very like the former, it's just that they have a smaller connector, physically. The "QT" comes from... "cutie", because the smaller modules are... "cute"? Sigh.
Anyway... moving on...
I2C devices have addresses. Sometimes a module comes hard-wired to "sit" at one address, and one address only. That's okay. You can either put it on a dedicated I2C connection, or use it with other I2C addresses, as long as no two devices on a single connection (in a single chain) have the same I2C address.
Keep your I2C chains short. I mentioned "networks" earlier. Don't imagine that you could, say, "wire" a house with a bunch of I2C temperature sensors, one for each room. There MAY be ways to run I2C across long distances, but, as an I2C novice, I don't know of one.
(See also https://www.tomshardware.com/features/stemma-vs-qwiic-vs-grove-connectors. (That "Tom" is, by the way, unconnected to the "Tom" who writes at WYWTK.com)
Just as an example of using an I2C device with a Seeed Wio Terminal, I am going to connect an Adafruit HTU31 Temperature & Humidity Sensor Breakout Board - STEMMA QT / Qwiic (Product ID 4832) to the Wio Terminal....
((That story has been moved to the "second attempt" section, above, as I hope you realize?)) Apologies for this crude edit.
====
Going back to Grove/ StemmaQT/ Qwiic: The basic idea of all three is to simplify connecting, changing, modules connected together to build systems. Most of the differences are relatively trivial. You can't ignore the details, but don't become bogged down in them.
In some cases even the physical plugs and sockets are the same. Where they are not, often there are cables that "bridge" the gap. Passive cables.
Please get in touch if you discover flaws in this page. Please cite the page's URL. (http://wywtk.com/ardu/wioterm/wio-term-i2c.htm).
If you found this of interest, please mention in forums, give it a Facebook "like", Google "Plus", or whatever. If you want more of this stuff, help!? There's not much point in me writing these things, if no one feels they are of any use.
|
Unlike the clever Google search engine, this one merely looks for the words you type, so....
* Spell them properly.
* Don't bother with "How do I get rich?" That will merely return pages with "how", "do", "I"....
Please also note that I have three other sites, and that this search will not include them. They have their own search buttons.
![]() Page has been tested for compliance with INDUSTRY (not MS-only) standards, using the free, publicly accessible validator at validator.w3.org. Mostly passes.
Page has been tested for compliance with INDUSTRY (not MS-only) standards, using the free, publicly accessible validator at validator.w3.org. Mostly passes.
AND passes...

....... P a g e . . . E n d s .....